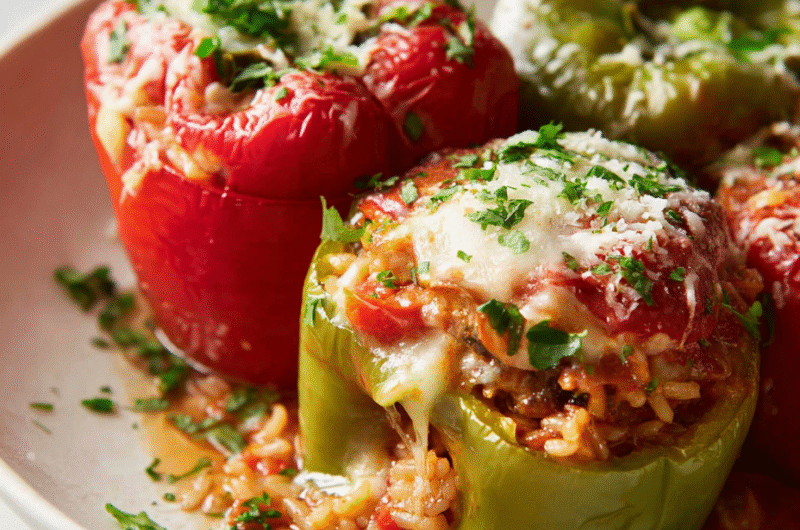
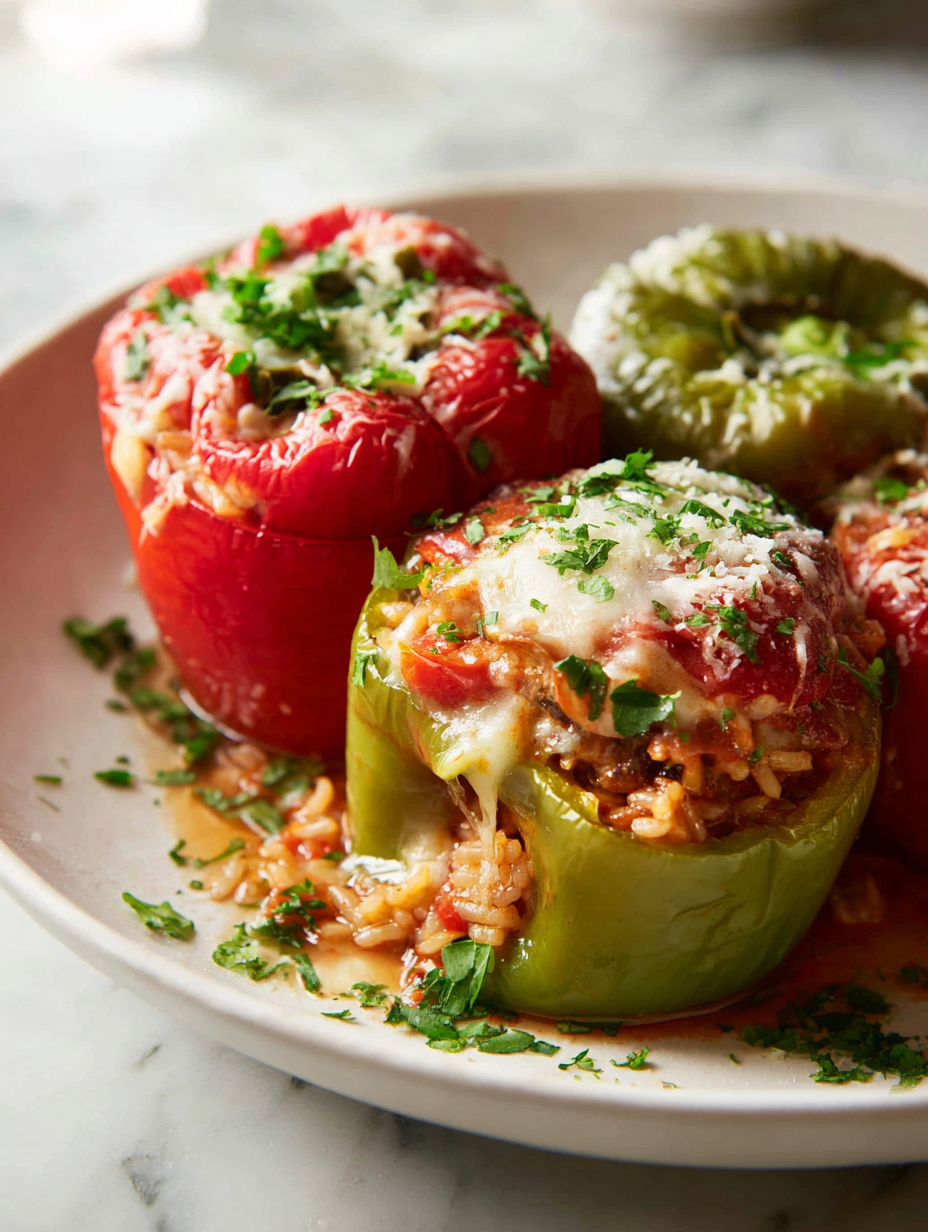
What draws me to baked stuffed peppers isn’t just the promise of a hearty, colorful meal but the way their edges get caramelized and smoky in the oven. It’s that imperfect, rustic charm—the way the peppers blacken slightly at the tips, adding a layer of sweetness that’s almost candy-like. This dish feels like a celebration of simple ingredients transformed by a bit of heat and patience.
I love how each pepper becomes its own little vessel, holding a warm, savory filling that’s a bit messy but so satisfying. It’s a dish that invites a bit of improvisation—using whatever grains, cheeses, or herbs you happen to have on hand. And when they come out of the oven, bubbling and golden, you get this aroma that’s smoky, sweet, and deeply comforting, a reminder that sometimes the best things come from a little char and chaos.
Focusing on how the caramelized edges of the peppers add a smoky sweetness that transforms a simple dish into something unexpectedly complex, highlighting the beauty of imperfect, rustic cooking.
Rustic Char and Sweetness
- That first time I pulled these peppers out of the oven, their smoky aroma hit me like a warm hug, reminding me of childhood Sunday dinners.
- Chopping fresh herbs and mixing the filling is my little ritual—makes every bite feel personal and alive, even on busy nights.
- Seeing the caramelized edges and crispy tops always makes me feel proud, like I’ve captured a bit of rustic beauty in my kitchen.
Rustic Char and Sweetness
This recipe came about during a busy week when I needed something nourishing but straightforward. I wanted to make use of the colorful peppers lingering in my fridge, and I started playing with different fillings, trying to keep things simple yet flavorful. The real magic happens when they bake and the peppers caramelize just enough to add a smoky sweetness that balances the savory filling. It’s a dish that feels rustic and imperfect, but somehow elevates everyday ingredients into something special.
Historical & Cultural Roots
- Stuffed peppers have roots in Mediterranean and Middle Eastern cuisines, where stuffed vegetables were a way to stretch ingredients and add flavor.
- The dish gained popularity in the United States during the mid-20th century, often as a hearty, family-friendly supper.
- Traditional variations include stuffing peppers with rice, ground meat, or a mix of herbs and grains, reflecting regional tastes and available ingredients.
Key Ingredients and Tips
- Bell peppers: I prefer the sweet, vibrant red ones—they get beautifully smoky and charred in the oven, adding depth to the dish. You can swap with poblanos for a smoky kick, but watch the heat level.
- Cooked grains: I use fluffy rice or quinoa, which soak up the filling’s flavors and add a satisfying texture. Feel free to use couscous or even cauliflower rice for a lighter version.
- Cheese: A melty, slightly tangy cheese like mozzarella or Monterey Jack gives that oozy top. Cheddar works well too, adding a sharper note, especially if you love a crusty, browned finish.
- Herbs & spices: Fresh parsley or cilantro brightens the filling with a fresh, herbal note. I love adding a pinch of smoked paprika for a subtle smoky aroma—adjust to your taste.
- Olive oil & seasoning: I drizzle a little good-quality olive oil over the peppers before baking for extra sheen and flavor. Season generously with salt and pepper to heighten all the other flavors.
- Tomato or sauce base: Using a small amount of tomato sauce or crushed tomatoes keeps things juicy and vibrant. For a richer filling, I sometimes stir in a splash of balsamic vinegar or lemon juice for brightness.
- Onions & garlic: Sautéed until fragrant, they build the savory foundation of the filling. Don’t rush this step—let the garlic turn golden and smell like warm heaven.
Spotlight on key ingredients
Bell peppers:
- I prefer the sweet, vibrant red ones—they get beautifully smoky and charred in the oven, adding depth to the dish. You can swap with poblanos for a smoky kick, but watch the heat level.
- Cooked grains: I use fluffy rice or quinoa, which soak up the filling’s flavors and add a satisfying texture. Feel free to use couscous or even cauliflower rice for a lighter version.
- Cheese: A melty, slightly tangy cheese like mozzarella or Monterey Jack gives that oozy top. Cheddar works well too, adding a sharper note, especially if you love a crusty, browned finish.
Cooked grains:
- Bell peppers: I prefer the sweet, vibrant red ones—they get beautifully smoky and charred in the oven, adding depth to the dish. You can swap with poblanos for a smoky kick, but watch the heat level.
- I use fluffy rice or quinoa, which soak up the filling’s flavors and add a satisfying texture. Feel free to use couscous or even cauliflower rice for a lighter version.
- Cheese: A melty, slightly tangy cheese like mozzarella or Monterey Jack gives that oozy top. Cheddar works well too, adding a sharper note, especially if you love a crusty, browned finish.
Notes for ingredient swaps
- Dairy-Free: Swap cheese for a creamy hummus or almond-based cheese. It won’t melt the same, but adds richness.
- Vegetarian: Use lentils or chopped mushrooms instead of meat for a hearty, plant-based filling.
- Low-Carb: Replace grains with cauliflower rice or more finely chopped nuts for texture and bulk.
- Gluten-Free: Ensure your grains are gluten-free, like quinoa or rice, and check spice blends for gluten.
- Spicy Kick: Add chopped jalapeños or a pinch of cayenne to the filling for extra heat and smoky aroma.
- Sweetness Boost: Stir in a touch of honey or maple syrup if you want a hint of caramelized sweetness.
- Herb Variations: Fresh basil or oregano can replace parsley for a different herbaceous note and aroma.
Equipment & Tools
- Oven: To bake and caramelize the peppers.
- Skillet: To sauté onions and garlic, develop flavor.
- Baking dish: To hold peppers upright during baking.
- Knives and scoop: To cut tops and remove seeds cleanly.
- Spoon or spatula: To stuff peppers with filling.
- Cheese grater: To shred cheese for topping.
Step-by-step guide to stuffed peppers
- Preheat your oven to 200°C (390°F). Gather all ingredients and prepare your workspace. Slice the tops off the peppers and scoop out seeds and membranes, leaving the stem intact for a rustic look.
- In a skillet over medium heat (about 160°C/320°F), heat a tablespoon of olive oil. Add chopped onions and cook for 3-4 minutes until translucent and fragrant. Stir in minced garlic and cook for another 30 seconds, until golden.
- Add cooked grains (about 1 cup) to the skillet. Season with salt, pepper, and a pinch of smoked paprika if using. Stir in chopped herbs and a splash of tomato sauce or crushed tomatoes. Cook for 2 minutes to meld flavors.
- Stuff each pepper generously with the filling. Press down lightly to compact. Place the peppers upright in a baking dish just big enough to hold them snugly. Drizzle the outside of the peppers lightly with olive oil.
- Bake in the preheated oven for 30-35 minutes. Check for caramelization and a smoky aroma. The peppers should be tender and slightly charred at the edges.
- Remove from oven and sprinkle with shredded cheese. Return to the oven for an additional 5 minutes, until cheese melts and bubbles. If cheese browns too quickly, tent with foil.
- Let the peppers rest for 5 minutes before serving. Plate them carefully, allowing some of the filling to spill out for rustic charm. Garnish with extra herbs if desired.
Allow the peppers to rest for 5 minutes to settle the filling. Serve hot, with extra herbs or a drizzle of olive oil for finishing. The filling should be moist, with a slight crispy top from the cheese.
How to Know It’s Done
- Peppers are tender and slightly charred at the edges.
- Cheese is melted and bubbling evenly on top.
- Filling is hot and aromatic, with a smoky, herbaceous scent.
Rustic Baked Stuffed Peppers
Ingredients
Equipment
Method
- Preheat your oven to 200°C (390°F). Slice the tops off the peppers and carefully scoop out the seeds and membranes with a spoon, leaving the stems intact for a rustic look.
- In a skillet over medium heat, warm a tablespoon of olive oil until it shimmers. Add the chopped onion and cook for about 3-4 minutes until it turns translucent and fragrant, with a slight sizzle.
- Add the minced garlic to the skillet and cook for another 30 seconds until fragrant, smelling rich and warm.
- Stir in the cooked grains and season with salt, pepper, and smoked paprika if using. Pour in the tomato sauce and cook for 2 minutes, allowing the flavors to meld and the mixture to thicken slightly.
- Stuff each pepper generously with the prepared filling, pressing down lightly to pack it in. Place the peppers upright in a baking dish snug enough to hold them steady.
- Drizzle a little olive oil over the outside of each stuffed pepper for a glossy finish and to enhance caramelization during baking.
- Bake in the preheated oven for about 30-35 minutes. You'll notice the peppers darkening at the edges and the filling bubbling and thickening.
- Remove the dish from the oven and evenly sprinkle the shredded cheese over the top of each pepper. Return to the oven and bake for an additional 5 minutes until the cheese is melted, bubbly, and slightly golden.
- Take the peppers out of the oven and let them rest for 5 minutes. The cheese will set a little, and the flavors will deepen. Garnish with chopped fresh herbs for a bright finish.
- Serve these rustic baked stuffed peppers warm, enjoying their smoky, caramelized edges and savory, cheesy filling. Let each bite reveal a perfect balance of tender peppers and flavorful stuffing.
Pro Tips for Perfect Stuffed Peppers
- Bolded mini-head: Use high heat when searing peppers to get that smoky, blistered skin quickly.
- Bolded mini-head: Drizzle olive oil over peppers before roasting for a glossy, flavorful finish.
- Bolded mini-head: Let stuffed peppers rest for 5 minutes after baking to allow flavors to settle and filling to set.
- Bolded mini-head: Check cheese topping at 25 minutes—if it’s browning too fast, tent with foil to prevent burning.
- Bolded mini-head: For a more intense smoky flavor, broil peppers for the last 2-3 minutes—watch closely to avoid charring.
- Bolded mini-head: Use a toothpick or skewer to test tenderness of peppers—should pierce easily without resistance.
- Bolded mini-head: For a gooey cheese top, grate cheese finely and sprinkle evenly before the final bake.
Common Baked Stuffed Peppers Mistakes
- FORGOT to remove seeds: Seeds can make peppers bitter; thoroughly scoop them out for even cooking.
- DUMPED filling: Overstuffed peppers may spill; fill just enough to avoid mess and uneven baking.
- OVER-TORCHED tops: Watch cheese browning; tent with foil if it browns too quickly.
- UNDER-BAKED peppers: Test with a skewer; peppers should be tender and filling hot and bubbling.
Fast Fixes for Baked Stuffed Peppers
- When peppers spill over, patch with a small piece of foil for a quick seal.
- If filling is too dry, splash a little broth or water before baking for added moisture.
- Splash a touch of lemon juice on the filling for brightness if it tastes flat.
- Dumped filling? Use it as a topping for baked potatoes or toast for quick flavor boost.
- Over-torched cheese? Shield with foil and add fresh herbs for a fresh flavor contrast.
Prep, store, and reheat tips
- Prep the peppers: Slice tops, remove seeds, and stuff the peppers a day in advance. Keep them covered in the fridge; the peppers stay fresh and firm for up to 24 hours, maintaining their bright color and crisp edges.
- Assemble the filling: Prepare the stuffing mixture ahead—mix grains, herbs, and seasonings. Store in an airtight container in the fridge for up to 2 days. It will be flavorsome and ready to spoon into peppers when needed.
- Refrigerate leftovers: Any baked stuffed peppers can be kept in an airtight container in the fridge for 2-3 days. Expect flavors to deepen slightly, with the cheese topping firming up. Reheat gently for best texture.
- Reheating: Warm in the oven at 180°C (350°F) for about 15-20 minutes until heated through. The peppers will be tender, and the filling will regain its moist, savory appeal with a slightly bubbly top. Avoid microwave reheating if you want to preserve the crispy edges.
Top questions about baked stuffed peppers
1. How do I pick the best peppers?
Use bell peppers that are firm and brightly colored. Slight wrinkling means they’re past peak freshness.
2. Should I cook the grains before stuffing?
Pre-cook grains like rice or quinoa so they stay fluffy and absorb flavors well during baking.
3. How long do I bake the peppers?
Bake peppers until they’re tender and slightly charred at the edges, about 30-35 minutes at 200°C (390°F).
4. What cheese works best for topping?
Use a mix of cheeses like mozzarella and cheddar for a gooey, flavorful topping that browns nicely.
5. How can I add smoky flavor?
For a smoky flavor, add smoked paprika to the filling or briefly broil the peppers at the end.
6. Should I rest the baked peppers before serving?
Rest the peppers for 5 minutes after baking to let the filling set and juices redistribute.
7. How full should I stuff the peppers?
Fill peppers just enough to avoid spilling and uneven cooking. Overstuffing can cause messes.
8. What if the cheese browns too fast?
If cheese browns too quickly, tent the peppers with foil to prevent burning while the filling heats through.
9. How do I reheat leftovers?
Reheat leftovers in the oven at 180°C (350°F) for about 15 minutes until hot and bubbling.
10. Can I make this dish ahead?
You can prepare the peppers and filling a day ahead, then bake when ready. Keep covered in the fridge.
These baked stuffed peppers aren’t just a meal—they’re a little reminder that rustic, imperfect cooking can turn humble ingredients into something special. The smoky edges and tender flesh make each bite a tiny celebration of how heat and patience bring out flavor.
Whenever I make these, I think about the mess and chaos in the kitchen—that’s part of the charm. They’re honest, straightforward, and perfect for a cozy night where comfort is the goal, no fuss needed.
Hi there! I’m Himani and welcome to Val’s Recipe Box. This little corner of the internet didn’t begin with me. It began with Val my neighbourhood aunt whose kitchen held more warmth than any fireplace ever could.


 This little corner of the internet didn’t begin with me.
It began with Val my neighbourhood aunt whose kitchen held more warmth than any fireplace ever could.
She was more of a friend and I’ve come to know her in the most unexpected way.
This little corner of the internet didn’t begin with me.
It began with Val my neighbourhood aunt whose kitchen held more warmth than any fireplace ever could.
She was more of a friend and I’ve come to know her in the most unexpected way.