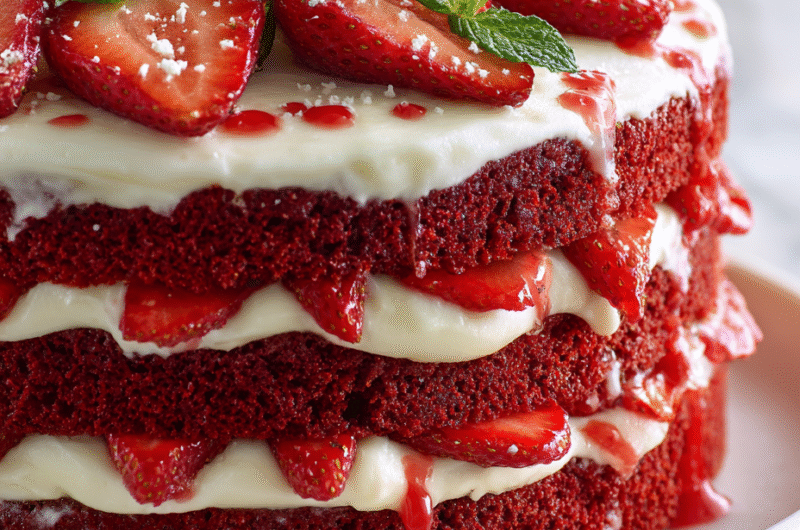
This Red Velvet Strawberry Cake is a bit of a showstopper, not just because of its vibrant red hue but because of how the bright, juicy strawberries cut through the velvety cocoa base. It’s the kind of cake that sparks conversations before anyone even takes a bite. I love making this for gatherings where everyone’s eyes go wide at the sight and then dive into the first slice with eager anticipation.
The magic is in the contrast—the richness of the cocoa, the perfect sweetness of strawberries, and that pop of color that makes it feel special. It’s a cake that feels fancy enough for celebrations but is surprisingly straightforward to pull together. Honestly, it’s become my go-to when I want to impress without pulling out complicated tricks.
Focusing on how the vibrant red hue and bright strawberry flavor contrast beautifully with the deep, velvety cocoa base, making it a stunning centerpiece that’s as visually striking as it is delicious.
The story behind this recipe
- This cake idea came from a picnic where I accidentally dropped a bowl of fresh strawberries onto a red velvet cake I was baking. Instead of abandoning it, I decided to layer those juicy berries into the frosting, creating a visual and flavor surprise. That accidental combo stuck with me, and now I chase that perfect balance of cocoa richness and bright strawberry bursts.
- I love how this cake feels like a celebration of contrasts—deep, velvety, and lush, yet fresh and lively with strawberries. It’s a reminder that sometimes the best ideas are born from small chaos in the kitchen. Making this cake is about embracing those little imperfections and turning them into something unexpectedly beautiful.
- heading: ‘The story behind this recipe’
Ingredient breakdown: key components
- Cream cheese: I love the tangy richness it brings; make sure it’s softened well before mixing, or you’ll get lumps in your frosting. Swap with mascarpone if you want a milder, silkier layer.
- Strawberries: Juicy, bright, almost candy-like when ripe. Use fresh, ripe berries for the best flavor; frozen can work but might be a bit watery—drain thoroughly before folding in.
- Red food coloring: I go for natural beet powder when I want a less synthetic hue, but if you want that classic vibrant red, don’t skimp on a good gel dye. It’s the visual punch you’re after.
- Cocoa powder: Unsweetened, Dutch-processed if you want a smoother, less acidic bite. Sift it directly into your batter to prevent clumps—this keeps the cake velvety.
- Cake flour: I prefer this for a tender crumb. If you only have all-purpose, add a tablespoon of cornstarch per cup to mimic the lightness. The texture is what makes this cake special.
- Sugar: I use superfine here—it dissolves faster and helps keep the batter smooth. Brown sugar adds a slight caramel note if you want more depth.
- Eggs: Fresh, large eggs give the cake stability and richness. Room temperature eggs blend better into the batter and help with rise—don’t forget to take them out early!
Spotlight on key ingredients
Cream cheese:
- I love the tangy richness it brings; make sure it’s softened well before mixing, or you’ll get lumps in your frosting. Swap with mascarpone if you want a milder, silkier layer.
- Strawberries: Juicy, bright, almost candy-like when ripe. Use fresh, ripe berries for the best flavor; frozen can work but might be a bit watery—drain thoroughly before folding in.
- Red food coloring: I go for natural beet powder when I want a less synthetic hue, but if you want that classic vibrant red, don’t skimp on a good gel dye. It’s the visual punch you’re after.
Strawberries:
- Cocoa powder: Unsweetened, Dutch-processed if you want a smoother, less acidic bite. Sift it directly into your batter to prevent clumps—this keeps the cake velvety.
- Juicy, bright, almost candy-like when ripe. Use fresh, ripe berries for the best flavor; frozen can work but might be a bit watery—drain thoroughly before folding in.
Notes for ingredient swaps
- Dairy-Free: Swap cream cheese with coconut cream cheese or cashew-based cheese. It keeps the tang but changes the richness slightly.
- Vegan: Use flaxseed eggs instead of chicken eggs, and coconut oil instead of butter. The cake will be a touch denser but still moist.
- Sugar: Substitute with honey or maple syrup, but reduce the liquid in the batter to compensate for the added moisture.
- Flour: Almond flour can be used for a nutty flavor and moist crumb, but expect a denser texture and a different crumb structure.
- Strawberries: Raspberries or blackberries can replace strawberries for a different tartness and color pop, though the flavor will shift.
- Food Coloring: Natural beet powder offers a less synthetic hue with a slight earthy note, while gel dyes give a vibrant red.
- Cocoa Powder: Dutch-processed cocoa provides a smoother, less acidic taste; natural cocoa will give a more pronounced chocolate flavor.
Equipment & Tools
- Oven: Bake the cake layers evenly.
- Cake pans (8-inch): Shape the cake layers.
- Mixing bowls: Combine ingredients separately.
- Electric mixer or whisk: Cream butter and cream cheese, blend ingredients smoothly.
- Spatula: Spread frosting evenly.
- Cooling racks: Cool cakes without condensation.
- Toothpick or cake tester: Check doneness of the cake.
- Serrated knife: Slice the cake cleanly.
Step-by-step guide to making
- Preheat oven to 175°C (350°F). Grease two 8-inch cake pans, line bottoms with parchment. Have cooling racks ready.
- In a large bowl, sift together 2 cups cake flour, 1 1/2 teaspoons baking soda, 1/2 teaspoon salt, and 2 tablespoons cocoa powder. Set aside.
- In another bowl, whisk 1 cup sugar and 1/2 cup vegetable oil until combined. Add 2 large eggs, one at a time, beating well after each. Mix in 1 teaspoon vanilla extract.
- In a small bowl, mash 1 cup ripe strawberries with a fork, then stir into the wet mixture. Add a few drops of red gel dye if you want a deeper color.
- Gradually add dry ingredients into wet, folding gently until just combined. Do not overmix; the batter should be smooth and slightly thick.
- Divide batter evenly between prepared pans. Tap pans lightly on the counter to release air bubbles.
- Bake for 25–30 minutes, or until a toothpick inserted in the center comes out clean. The edges should be set, and the top slightly springy.
- Remove from oven, let cakes cool in pans 10 minutes, then turn out onto cooling racks. Cool completely before frosting.
- While cakes cool, prepare strawberry frosting. Mix softened cream cheese and butter until creamy. Fold in chopped strawberries and powdered sugar to taste.
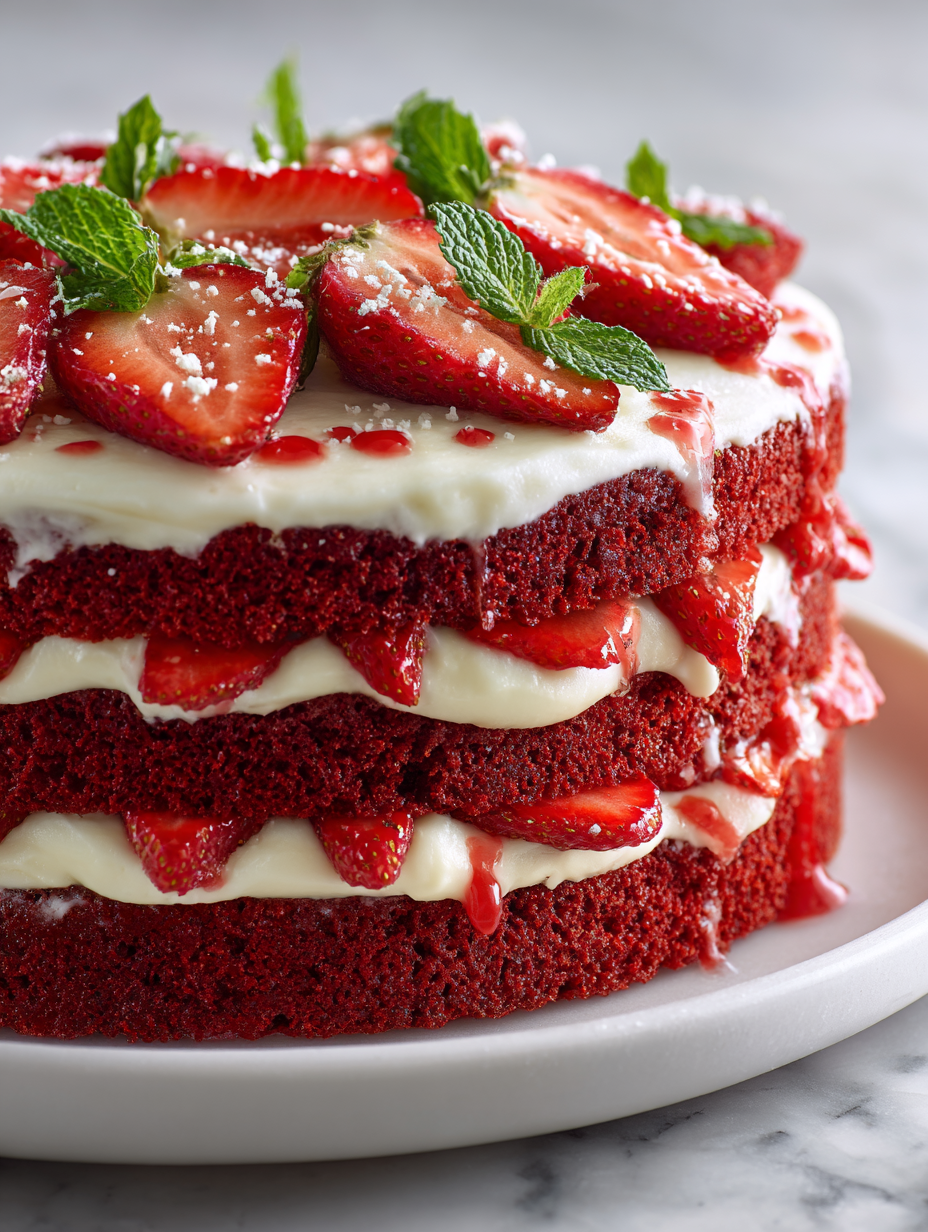
- Once cakes are cooled, spread a layer of frosting on the first layer, top with sliced strawberries, then cover with the second cake. Frost the outside evenly.
- Decorate with fresh strawberries, if desired. Chill for at least 30 minutes to set the frosting before slicing.
- Slice with a sharp serrated knife. Serve at room temperature for best flavor and texture.
Let the assembled cake chill in the fridge for 30 minutes to set the frosting. Slice with a sharp serrated knife, serve at room temperature for the best flavor, and enjoy the contrast of velvety cocoa and bright strawberry bursts.
How to Know It’s Done
- Cake is golden brown and springs back when lightly pressed.
- Toothpick comes out clean from the center of the cake.
- Frosting is smooth, glossy, and holds its shape when spread.
Red Velvet Strawberry Cake
Ingredients
Equipment
Method
- Preheat your oven to 175°C (350°F). Grease two 8-inch cake pans and line the bottoms with parchment paper.
- Sift together the cake flour, baking soda, salt, and cocoa powder in a large bowl. Set aside.
- In another bowl, whisk the sugar and vegetable oil until the mixture is smooth and slightly shiny.
- Add the eggs one at a time, beating well after each addition. Stir in vanilla extract.
- Fold in the mashed strawberries, mixing gently until evenly incorporated. Add a few drops of red gel dye if you want a more intense color.
- Gradually add the dry ingredients into the wet mixture, folding gently to combine without overmixing. The batter should be smooth and slightly thick.
- Divide the batter evenly between the prepared pans and smooth the tops with a spatula. Tap the pans lightly on the counter to release air bubbles.
- Bake for 25–30 minutes, or until a toothpick inserted into the center comes out clean. The edges should be set and the top springy.
- Allow the cakes to cool in the pans for 10 minutes, then turn them out onto cooling racks. Cool completely before frosting.
- While the cakes cool, beat the softened cream cheese and butter together until smooth and fluffy. Fold in powdered sugar and chopped strawberries to make the frosting.
- Spread a layer of frosting on the first cake, add sliced strawberries if desired, then top with the second layer. Cover the entire cake with the remaining frosting.
- Decorate with fresh strawberries on top, then chill the cake for at least 30 minutes to set the frosting. Slice with a serrated knife and serve at room temperature.
Tips for perfect results
- Bolded mini-head: Use room temperature ingredients → Ensures smoother batter and better rise during baking.
- Bolded mini-head: Gently fold dry into wet → Prevents overdeveloping gluten, keeping the cake tender.
- Bolded mini-head: Tap pans on counter → Releases trapped air bubbles for even layers and uniform texture.
- Bolded mini-head: Add food coloring gradually → Achieves vibrant hue without overmixing, which can dull color.
- Bolded mini-head: Chill cake before slicing → Firms up the crumb, making cleaner, neater slices.
- Bolded mini-head: Use a serrated knife → Cuts through soft layers cleanly, avoiding squished edges.
- Bolded mini-head: Incorporate strawberries last → Keeps berries fresh, juicy, and prevents bleeding into the batter.
Common mistakes and how to fix them
- FORGOT to preheat the oven → Ensure oven reaches 175°C (350°F) before baking.
- DUMPED batter into pans without smoothing → Spread evenly for uniform layers and even baking.
- OVER-TORCHED the edges → Cover edges with foil if browning too fast, check for doneness early.
- MISSED cooling time → Cool completely to prevent frosting melting or sliding off.
Quick fixes and pantry swaps
- If batter looks too thick → Splash in a teaspoon of milk to loosen it up.
- When frosting is runny → Chill it for 10 minutes; it firms up and spreads easier.
- Splash extra red dye if color is dull → Brighten with a few more drops for vibrant appeal.
- When strawberries are watery → Pat dry thoroughly; excess moisture can make frosting slide.
- Patch cracked cake layers → Use a little frosting to seal cracks and smooth out imperfections.
Prep, store, and reheat tips
- Prepare the cake layers a day in advance; wrap tightly in plastic wrap and store at room temperature for up to 24 hours, keeping the crumb soft and moist.
- Frost the cake a day ahead and keep refrigerated; the flavors meld beautifully overnight, but bring to room temperature before serving for optimal texture.
- Strawberry topping and frosting can be made up to 2 days ahead; store in airtight containers in the fridge, and stir gently before applying to prevent separation.
- Cake is best eaten within 2–3 days; after that, the strawberries may soften and the texture might shift slightly, so plan accordingly.
- Reheat slices briefly in a 150°C (300°F) oven for 5 minutes if you prefer slightly warmer, softer bites; watch for melting frosting or berries.
Top questions about Red Velvet Strawberry Cake
1. How do I get the strawberries to stay firm in the frosting?
Use ripe, juicy strawberries for the brightest flavor. Fresh berries give a vibrant burst, while frozen ones need thorough draining to prevent sogginess.
2. Can I make the cake without food coloring?
Add a few drops of red gel dye gradually until you reach the desired hue. Natural beet powder works, but the color tends to be softer and more muted.
3. How do I know when the cake layers are done?
Bake until the edges are golden and a toothpick inserted in the center comes out clean. The cake should feel springy but not wet or dense.
4. Should I refrigerate the cake before serving?
Chill the assembled cake for at least 30 minutes before slicing. This helps set the frosting and prevents crumbs from sliding into the slices.
5. Can I prepare the batter ahead of time?
Use room temperature ingredients for a smoother batter and better rise. Cold eggs or butter can cause the batter to be lumpy or not rise well.
6. What if my frosting is too soft to spread?
If the frosting is too runny, chill it for 10 minutes. If it’s too thick, warm it slightly or add a tiny splash of milk, then whip again.
7. How do I cut neat slices?
Use a serrated knife to cut through soft layers smoothly. Dipping the knife in hot water and wiping it dry helps for cleaner slices.
8. How long does the cake stay fresh?
Store the cake in an airtight container in the fridge for up to 3 days. Bring to room temperature before serving for optimal flavor and texture.
9. Can I freeze the cake layers?
You can freeze the baked layers wrapped tightly in plastic for up to 2 months. Thaw at room temperature before frosting.
10. How can I boost the flavor of the frosting?
Add a splash of vanilla extract or almond flavoring to enhance the frosting. For extra brightness, a tiny squeeze of lemon juice can lift the strawberry flavor.
This cake feels like a celebration of contrasts—deep cocoa richness paired with bright, juicy strawberries. It’s a bit messy to make, but that’s part of the charm, right? When you slice into it and see that vibrant red and lush filling, it’s always worth the effort.
In the end, it’s not just about the pretty layers or the flavor—it’s about those small moments of joy, whether it’s sharing a slice or just tasting that first, velvety bite. Sometimes, the imperfect cakes turn out to be the most memorable ones.
Hi there! I’m Himani and welcome to Val’s Recipe Box. This little corner of the internet didn’t begin with me. It began with Val my neighbourhood aunt whose kitchen held more warmth than any fireplace ever could.


 This little corner of the internet didn’t begin with me.
It began with Val my neighbourhood aunt whose kitchen held more warmth than any fireplace ever could.
She was more of a friend and I’ve come to know her in the most unexpected way.
This little corner of the internet didn’t begin with me.
It began with Val my neighbourhood aunt whose kitchen held more warmth than any fireplace ever could.
She was more of a friend and I’ve come to know her in the most unexpected way.